
How to Write a Weather Instruments Report

Are you teaching a weather unit this year? Kids love checking the thermometer, watching a wind vane spin, and measuring rain after a storm. A weather instruments report turns that curiosity into real research and writing. This guide walks through the exact process, so your students can go from choosing an instrument to a finished, illustrated report.
What Is a Weather Instruments Report?
A weather instruments report is a piece of informative writing. A student researches one weather tool and shares what they learned with a reader.
Students find out what the instrument looks like, what it's used for, and how it works. Then they organize their facts into a written report.
This topic is a natural fit for a science unit on weather. It also builds great vocabulary. By the end, your students will know words like anemometer, barometer, and precipitation.
How to Write a Weather Instruments Report in 7 Steps
Step 1: Choose a Weather Instrument
Students can choose their instrument in a few different ways:
Pick their own instrument
Draw one out of a hat
Get one from you, so every instrument in your unit is covered
Here are some instruments that work well for 1st to 3rd grade:
Thermometer: measures temperature
Rain gauge: measures how much rain falls
Anemometer: measures wind speed
Wind vane: shows which way the wind is blowing
Barometer: measures air pressure
Wind sock: shows wind direction and strength
If you have a few real instruments at school, set them out. Kids pick a topic faster when they can see and touch the tool.
Step 2: Research the Instrument
Once students have their instrument, it's time to find facts. Good sources include:
Kid friendly websites, such as National Geographic Kids
Library books about weather
Your science textbook or nonfiction readers
A real instrument in your classroom or schoolyard
Watching an instrument work is research too. Students can record the temperature each morning or check the rain gauge after a storm.
Step 3: Make Jot Notes
This is the most important step, and often the trickiest. Jot notes teach students to pull out key facts instead of copying whole sentences from a book.
A jot notes page with clear categories makes this much easier. The categories in this report are:
Name of Instrument
Description: What does it look like? Does it have more than one part?
Uses of Instrument: What is it used for? What does it tell us about the weather?
When Used: Is it used all the time, or only at certain times?
How to Use: How does it work? Are there steps to follow?
Where Used: Is it used at home, in a backyard, or at a weather station?
Other Interesting Facts
Need help teaching this step? Read How to Teach Kids to Write Jot Notes.
Step 4: Write the Draft
Now students turn their jot notes into sentences. Each category becomes a short paragraph.
Remind them that a draft is a first try. It doesn't need to be perfect. The goal is to get their ideas down in their own words.

Step 5: Revise and Edit
Next, students reread their work and make it better. They can:
Add a missing fact from their jot notes
Check that each sentence makes sense
Fix capitals, periods, and spelling
Editing bookmarks and a simple checklist help students check their own work. Partners can also trade drafts and give one compliment and one suggestion.
Step 6: Write the Good Copy
Now it's time for the final report. Students copy their revised writing onto clean report pages, one page for each category.
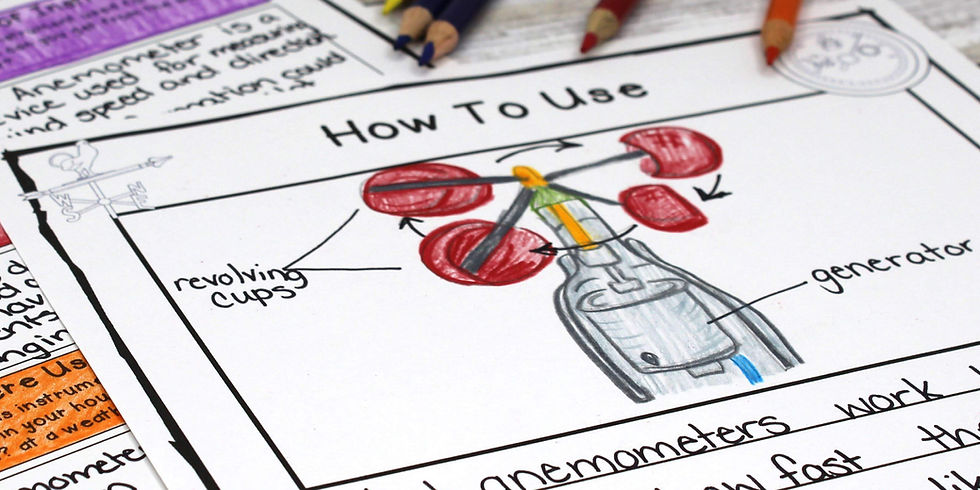
The page above is the "How to Use" section. The student explains that most anemometers measure how fast the wind pushes a set of spinning cups, a bit like a small windmill.

Step 7: Illustrate the Report
The last step is the picture. A labeled diagram works especially well for weather instruments.
Encourage students to:
Draw the instrument large and clear
Label the main parts, such as the cups or the generator
Add arrows to show movement, like wind spinning the cups
Labels turn a drawing into a science diagram. They also show you how well the student understands the instrument.
Bonus Step: Assess the Report (Optional)
Once the reports are finished, students can check their own work with a self assessment. Partners can do a peer assessment, and you can use a rubric for the final mark.
Want to see how the assessments and rubrics fit together? Read How to Use Report Writing Resources in Your Classroom.
How to Differentiate Weather Instruments Report Writing
Every class has a wide range of writers. Here are a few simple ways to support them all:
For beginning writers: Use jot notes pages with fewer categories, and primary lines with a drawing space.
For most writers: Use the regular jot notes and draft pages, with one paragraph per category.
For strong writers: Ask them to compare two instruments, or add a page about how weather forecasters use the tool.
For hands on learners: Let them use the real instrument and record what they see for a week.
For more ideas, read How to Differentiate Report Writing With Kids.
Ready to Teach It?
The Weather Instruments Report Writing Unit has everything shown in this post. It includes jot notes pages at 3 levels, draft and good copy pages with primary and regular lines, posters, bookmarks, a word bank, assessments, and rubrics. Just print and teach.
Free download: Grab the Report Writing 7 Step Poster. Hang it up so students always know what comes next.


